
Stone-coated metal roofing has gained ground in Texas for good reason. It blends durability with visual appeal and holds up well under the state’s unpredictable weather. Homeowners and business owners often choose it for the balance of protection and style. But what exactly goes into installing this type of roof? Understanding the process helps set the right expectations and ensures the project moves smoothly from start to finish.
Getting Started with the Initial Assessment
Before anything is ordered or installed, a roofing team must inspect the property. This includes examining the current roof structure, noting any damage or irregularities, and checking for adequate ventilation. The slope of the roof, condition of the decking, and any signs of water damage all factor into the plan.
A proper inspection allows the contractor to identify if any prep work is needed before installing the new roof. In Texas, where roof systems endure everything from hail to high heat, skipping this step can lead to future issues. The contractor will also take measurements and use them to calculate the amount of materials required.
Choosing the Right Underlayment
One of the most important components in this system is what lies beneath the metal panels. Underlayment acts as a moisture barrier and adds another layer of protection. In Texas, synthetic underlayments are commonly used due to their heat resistance and longer lifespan compared to felt.
The underlayment is typically rolled out and fastened to the roof decking using cap nails. It must be installed with precision to prevent wrinkles or gaps, as these can compromise its performance. Some roofers may also include an ice and water shield in valleys or around penetrations, even though ice dams are rare in much of Texas.
Preparing the Roof for Metal Panels
Once the underlayment is in place, installers move on to furring strips or battens. These strips create a gap between the metal and the underlayment. The air gap helps with ventilation and can improve energy efficiency. Some systems are direct-to-deck, but many stone-coated metal options benefit from being installed over battens, especially when heat reduction is a priority.
Fasteners used to secure the battens are driven directly into the trusses or rafters. This provides a solid anchoring point for the metal panels and distributes weight more evenly across the structure. Ensuring the battens are level is crucial, as this step directly affects the appearance and integrity of the final roof.
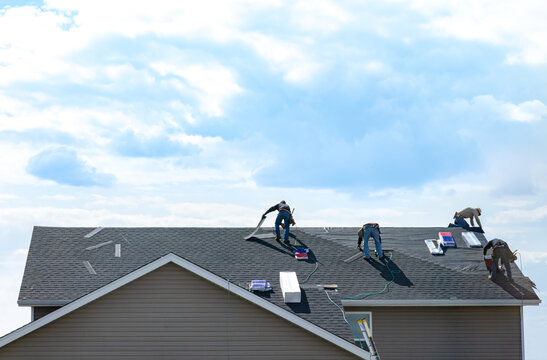
Installing the Stone-Coated Panels
Now the visual part begins. Stone-coated panels are laid in a pattern that depends on the manufacturer’s design. Each panel overlaps the one next to and below it to shed water and resist wind uplift. In Texas, where winds can be strong during storms, panel placement and fastening must meet or exceed local building codes.
Panels are usually installed starting from the bottom edge of the roof and working upward. Installers use screws or nails that are corrosion-resistant and often color-matched to blend in with the panel surface. The fasteners go through designated areas on the panel to avoid cracking the stone coating.
At roof edges and valleys, flashing is integrated to guide water away from potential weak points. Chimneys, skylights, and vent pipes are also sealed and flashed properly to prevent leaks.
Handling Ridge Caps and Finishing Touches
The final step in the installation is attaching ridge caps. These are specially formed pieces that cover the roof peak and help ventilate the attic space. They also complete the look of the roof and protect it from wind-driven rain.
Sealants are sometimes applied where panels meet other roof features. While stone-coated metal roofs are known for being low-maintenance, taking time to seal vulnerable joints adds extra peace of mind, especially in climates like Texas where storms can appear suddenly.
After all pieces are in place, the crew performs a cleanup and final inspection. They make sure all fasteners are properly seated, flashing is sealed, and there are no scratches or chips in the coating. The site is cleaned of any debris or leftover materials, and a walkthrough with the homeowner ensures everyone is satisfied with the result.
Post-Installation Considerations
After the roof is installed, homeowners receive documentation on the product warranty and any workmanship guarantees. These documents should be kept in a safe place in case any future service is needed.
It’s a good idea to schedule periodic inspections, especially after major weather events. Though stone-coated metal is tough, flying debris or falling branches can cause cosmetic or structural damage. Catching small issues early can prevent larger repairs down the line.
Some homeowners also notice a drop in energy bills after installing a stone-coated metal roof. The reflective surface and built-in air gap help reduce attic temperatures, especially in the Texas summer heat.
Conclusion
Installing a stone-coated metal roof isn’t a quick patch job—it’s a multi-step process that takes skill, planning, and attention to detail. Each stage builds upon the last to create a roofing system that performs well over time. Skipping or rushing steps can lead to poor results, which is why choosing a contractor familiar with Texas weather and codes is essential.
A well-installed stone-coated metal roof not only looks sharp but can also last for decades with minimal upkeep. That’s why so many Texans are making the switch. If you’re considering this type of roof, knowing the process in advance helps you feel more confident in your decision—and ensures there are no surprises along the way.
Field Operations Director
With over 30 years of hands-on experience in the residential and commercial roofing industry, Scott Marestein has done it all — from installer to Vice President of Operations, managing projects ranging from 5 to 20,000 squares across five states. A seasoned estimator, project manager, and sales professional, Scott has built relationships with national accounts including Whataburger, Darden Restaurants, and the U.S. Postal Service.